Why Does My Toilet Keep Running After Flushing? (And How to Fix It)
You flush the toilet, walk away, and a minute later, you can still hear water trickling. Then two minutes. Then five. If your toilet keeps running after flushing, you are not dealing with a mystery. You are dealing with one of the most common plumbing issues in any home, and the good news is that most causes come down to a small rubber part or a simple adjustment inside your tank.
- What Actually Happens Inside Your Toilet Tank When You Flush
- Why Does a Toilet Keep Running After Flushing? The Most Common Causes
- A Worn or Warped Flapper Valve
- A Fill Valve That Won’t Shut Off
- A Float Set Too High
- The Refill Tube Is Positioned Incorrectly
- How to Inspect Your Toilet Tank Without Any Tools
- How to Fix a Running Toilet: Simple Repairs First
- Adjusting the Float to the Correct Water Level
- Repositioning or Replacing the Refill Tube
- Cleaning Mineral Buildup From the Flapper Seat
- How to Replace a Flapper Valve: Step by Step
- How to Replace a Toilet Fill Valve: When Adjustment Is Not Enough
- How Much Water Does a Running Toilet Actually Waste?
- When to Call a Plumber Instead of Fixing It Yourself
- How to Prevent Your Toilet From Running Again
- Conclusion
You do not need a plumber for this. You do not need special training. In most cases, you need about 30 minutes, a little patience, and this guide.
We will walk through what causes a running toilet, how to inspect the tank yourself, and how to fix the problem step by step, starting with the simplest solutions first.
What Actually Happens Inside Your Toilet Tank When You Flush
Most people flush a toilet dozens of times a week without ever thinking about what happens inside the tank. Understanding the basic mechanics makes diagnosing a problem much easier.
Here is what happens from the moment you press the handle:
- The handle lifts a chain connected to the flapper — a rubber seal at the bottom of the tank.
- The flapper lifts, releasing water from the tank down into the bowl. This is the flush.
- As the tank empties, the float (a buoyant ball or cup attached to the fill valve) drops with the water level.
- That dropping float signals the fill valve to open and let fresh water back into the tank.
- As water refills the tank, the float rises back up.
- When the float reaches the correct height, it tells the fill valve to shut off.
- The flapper settles back down and seals the tank, ready for the next flush.
The whole cycle takes about 60 to 90 seconds in a healthy toilet. When something in that chain breaks down, water either keeps entering the tank and spilling into the bowl, or the fill valve never gets the signal to stop. Either way, the result is a toilet that never stops running.
Why Does a Toilet Keep Running After Flushing? The Most Common Causes
A toilet keeps running after flushing for one of four reasons in the vast majority of cases. Before you take anything apart, it helps to know what you are looking for:
- A worn or warped flapper valve — the rubber seal has degraded and no longer closes tightly, letting water slowly leak into the bowl
- A faulty fill valve — the valve that controls water flow into the tank is stuck open or cannot shut off properly
- A float set too high — the water level in the tank sits above the overflow tube, meaning water constantly drains away
- A mispositioned refill tube — the small tube that directs water into the bowl is submerged in the overflow pipe, which creates a continuous siphon effect.t
We will cover each of these in detail below. For most homes, the fix starts with the flapper.
A Worn or Warped Flapper Valve
The flapper is a small rubber disc that sits at the bottom of your tank and acts as a seal. Every time you flush, it lifts, lets water out, then drops back down and reseals.
Over time, rubber degrades. It warps, cracks, or hardens, and when it does, it can no longer form a tight seal against the flush valve seat beneath it. Water trickles past it constantly, which means the fill valve has to keep running to compensate.
Drop-in bleach tablets and harsh cleaning chemicals accelerate this process significantly. Mineral deposits from hard water also build up on the flapper seat and prevent a clean seal, al even on newer flappers.
This is the single most common cause of a running toilet. If your toilet is more than five years old and you have never replaced the flapper, it is usually the first thing to check.
A Fill Valve That Won’t Shut Off
The fill valve controls how water enters your tank after a flush. When it works correctly, it opens as the tank empties and closes once the float rises to the right level.
When a fill valve fails, it either stays partially open, allowing a slow trickle of water to keep entering the tank indefinitely, or it cannot respond to the float’s signal at all. You will typically hear a continuous hissing sound from the tank.
Older toilets use a ballcock valve with a large floating ball on a metal or plastic arm. Newer toilets use a float-cup valve, where a cylindrical float slides up and down on the valve body. Both can fail, but float-cup valves are more reliable and easier to replace.
A Float Set Too High
The float tells the fill valve when to stop. If the float is adjusted too high, the water level in the tank rises above the top of the overflow tube, which is the vertical tube standing in the centre of your tank.
Water then spills continuously into that overflow tube and drains into the bowl, keeping the fill valve running non-stop. Your toilet is not broken in this case, just incorrectly adjusted.
This is often a very quick fix. No parts needed, no tools required in many cases. Just a small adjustment to the float height, which we cover in the fix section below.
The Refill Tube Is Positioned Incorrectly
The refill tube is a small, thin tube that runs from the fill valve to the top of the overflow pipe. Its job is to send a small amount of water directly into the bowl during the refill cycle to restore the water seal in the trap.
If this tube has been pushed too far down inside the overflow pipe, it creates a siphon effect that draws water from the tank continuously. It looks like a minor detail, but it can cause your toilet to run for hours.
To check this in under 30 seconds, simply look at where the refill tube meets the overflow pipe. The tube should rest just above the opening, not inside it.
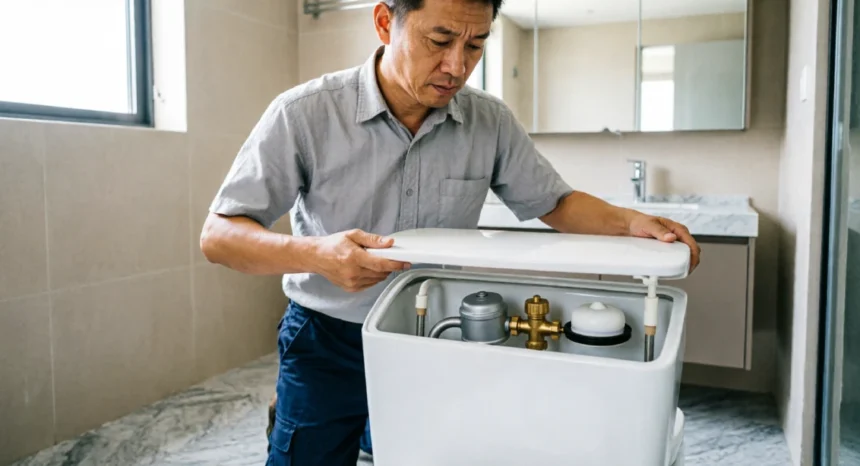
How to Inspect Your Toilet Tank Without Any Tools
Lifting the lid off a toilet tank is completely safe. The water inside is clean — it is the same water that comes from your supply line, before it ever reaches the bowl. There is nothing to worry about.
Here is how to do a thorough inspection in about two minutes:
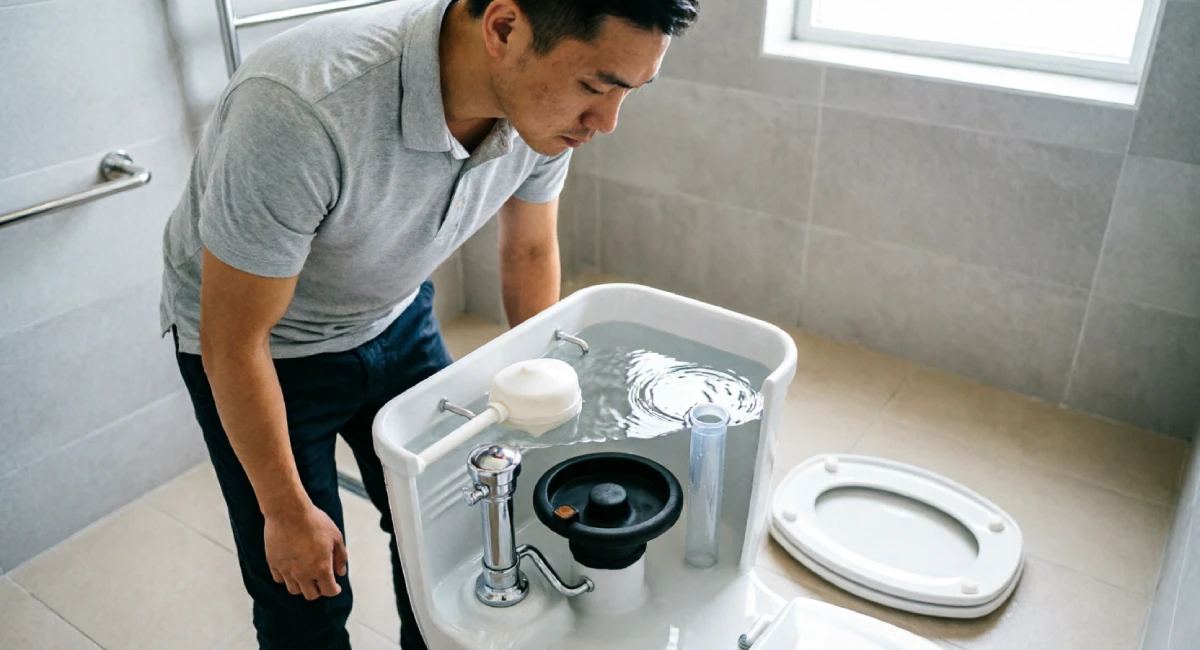
- Lift the tank lid carefully and set it flat on the floor or a folded towel. Tank lids are ceramic and can crack if they tip.
- Look at the water level. It should sit roughly 1 inch (2.5 cm) below the top of the overflow tube. If it is level with or above that tube, you have a float adjustment issue.
- Watch the flapper. If you can see or hear water moving even without flushing, the flapper is likely not sealing.
- Listen for hissing. A hiss from the fill valve area means the valve is not shutting off properly.
- Check the refill tube. Look at where the thin tube connects to the overflow pipe. If it is submerged inside, pull it out and let it rest just above the rim.
- Look at the bowl. Ripples or movement in the bowl water while the toilet has not been flushed often confirms a leaking flapper.
Most people figure out the problem in this step alone. The fix is usually right in front of you.
The Dye Test: A Trick That Tells You Everything in Two Minutes
If you are not sure whether the flapper is leaking, the dye test removes all doubt.
Here is exactly how to do it:
- Do not flush the toilet for at least 10 minutes beforehand.
- Drop a few drops of food colouring or a dye tablet into the tank only, not the bowl.
- Wait 10 to 15 minutes without flushing.
- Look at the toilet bowl water.
If the bowl of water changes colour, the dye has passed through the flapper. That confirms the flapper is not sealing and needs cleaning or replacement.
If the bowl water stays clear, the flapper is fine. The problem lies with the fill valve, the float, or the refill tube.
This test costs nothing and saves you from replacing the wrong part.
How to Fix a Running Toilet: Simple Repairs First
Before you spend a single dollar at a hardware store, try the adjustments below. The majority of running toilet problems are solved without buying anything. Work through these in order, from easiest to slightly more involved.
Adjusting the Float to the Correct Water Level
The target water level in your tank is approximately 1 inch (2.5 cm) below the top of the overflow tube. Most tanks also have a water line marked on the inside wall.
If you have an older ballcock valve (with a large float ball on a long arm):
- The float ball sits on the end of a horizontal arm.
- If the ball is sitting too high, gently bend the arm downward by about half an inch.
- This lowers the point at which the float shuts off the water.
- If the arm is plastic and will not bend, look for an adjustment screw or nut near the valve body.
If you have a modern float-cup valve:
- The float is a cylinder or cup that clips to the vertical valve body.
- Look for a small adjustment screw at the top of the fill valve, or a clip on the side of the float.
- Turn the screw counterclockwise or slide the clip downward to lower the water level.
- Test by flushing and watching where the water stops refilling.
One note: do not set the float too low. If the water level drops more than 1 to 1.5 inches below the overflow tube, you may end up with a weak flush. Aim for that 1-inch mark and test from there.
Repositioning or Replacing the Refill Tube
Look at the thin tube running from the side of the fill valve to the top of the overflow pipe.
If it is inserted down inside the overflow pipe, pull it out. It should clip or rest just above the rim of the overflow pipe opening, not inside it. Most refill tubes come with a small clip for this purpose. If yours does not have one, a small binder clip or a piece of tape can hold it in position temporarily.
If the tube is cracked or has lost its flexibility and keeps slipping back in, a replacement refill tube costs very little at any hardware store and clips directly onto the fill valve.
Cleaning Mineral Buildup From the Flapper Seat
Before you replace the flapper, take two minutes to clean it. In hard water areas, especially, mineral deposits build up on both the rubber flapper and the plastic or metal seat it rests against. This stops a clean seal from forming.
Here is how to clean it:
- Shut off the water supply valve behind the toilet (turn clockwise).
- Flush to drain most of the water from the tank.
- Lift the flapper and look at the seat beneath it.
- Wipe the seat with a cloth dampened in white vinegar or a mild descaler.
- Run your finger around the edge of the flapper. If it feels gritty or has visible deposits, wipe those off too.
- Turn the water back on and let the tank refill.
- Run the dye test again after 10 minutes.
This running toilet fix costs nothing and works more often than people expect. If the problem persists after cleaning, then replacement is the next step.
How to Replace a Flapper Valve: Step by Step
If cleaning did not solve the problem, replacing the flapper valve is the next step. It is one of the cheapest, most straightforward repairs in home maintenance. A replacement flapper typically costs between $5 and $15, and the job takes about 10 minutes.
Here is how to do it:
- Turn off the water supply. The shut-off valve is usually on the wall behind the toilet, close to the floor. Turn it clockwise until it stops.
- Flush the toilet to drain most of the water from the tank.
- Remove the flapper. Unhook the two side ears from the pegs on the overflow tube, then disconnect the chain from the flush handle arm. The old flapper should lift straight out.
- Take the old flapper to the hardware store if you are unsure of the size. Most staff can match it in seconds.
- Attach the new flapper by hooking the ears over the same pegs on the overflow tube.
- Connect the chain to the flush handle arm. Leave about half an inch of slack in the chain. Too tight and the flapper will not seal; too loose and it will not lift fully when you flush.
- Turn the water back on and let the tank refill.
- Test with the dye method after 10 minutes to confirm the seal is holding.
That is the complete flapper replacement. If you want to be thorough, wipe the seat clean (as described above) before fitting the new flapper.
How to Choose the Right Replacement Flapper
Universal flappers work for most standard toilets and are sold at almost every hardware store. However, some brands use specific sizes or designs that require an exact match.
To find your toilet’s brand and model:
- Check inside the tank lid. The brand and model number are usually stamped or printed there.
- If not, check the back of the bowl near the base.
Common flapper sizes are 2-inch (the most common) and 3-inch (found on some higher-flush-volume models). Flappers are made from either standard rubber or chlorine-resistant silicone. If you use drop-in cleaning tablets in your tank, choose a silicone flapper. It will last significantly longer.
How to Replace a Toilet Fill Valve: When Adjustment Is Not Enough
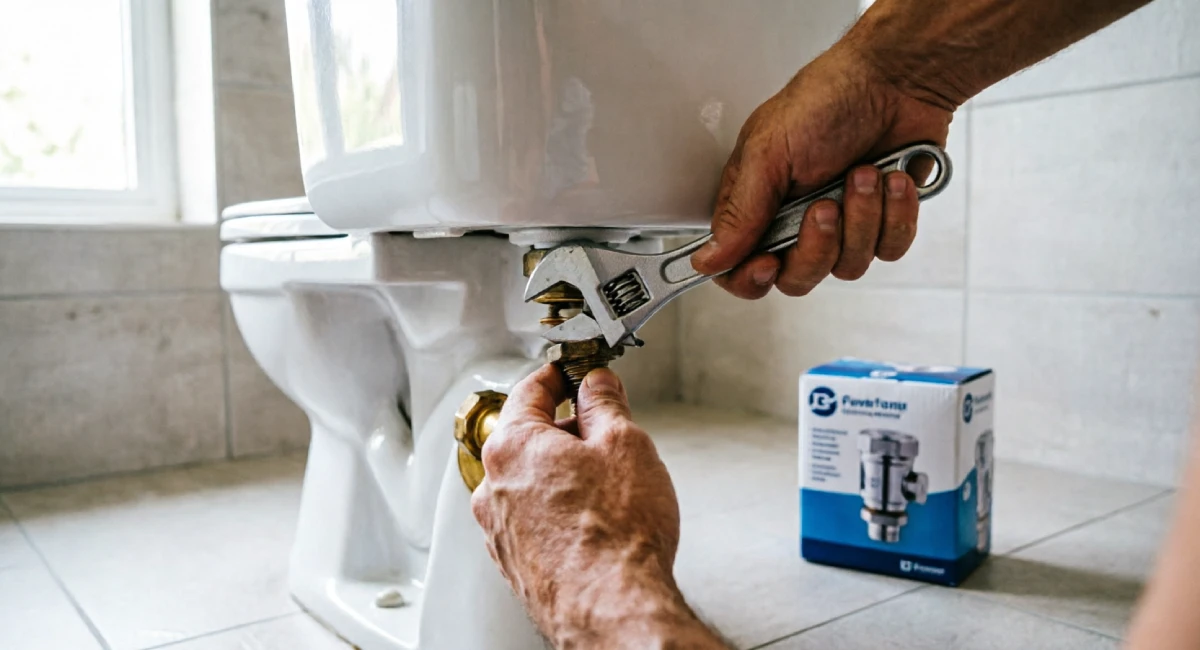
Sometimes adjusting the fill valve does not hold. If you hear continuous hissing from the tank, the toilet keeps running more than 30 seconds after a flush, or the valve loses its adjustment within a day or two, the fill valve itself needs replacing.
This is a 30-minute job. Fill valves are inexpensive, and the process is straightforward even if you have never done it before. Addressing this toilet tank problem completely will also stop the water waste that a faulty valve causes around the clock.
Here is how to replace a fill valve:
- Turn off the water supply valve behind the toilet.
- Flush the toilet to empty the tank as much as possible.
- Sponge out the remaining water at the bottom of the tank and wring it into a bucket. The tank does not need to be perfectly dry, just mostly empty.
- Disconnect the water supply line from the base of the tank. Have a towel ready for small drips.
- Remove the old fill valve. Reach into the tank and hold the valve body steady, then unscrew the plastic nut on the underside of the tank (underneath, outside the tank). The valve will lift out.
- Insert the new fill valve through the same hole. Most modern replacement valves are adjustable to fit different tank heights.
- Hand-tighten the nut underneath the tank first, then snug it with a wrench. Do not overtighten on plastic fittings.
- Reattach the water supply line.
- Set the water level by adjusting the valve height before turning the water on. Most valves have a mark for where the water line should sit.
- Turn the water back on slowly. Let the tank fill and observe. Adjust the float cup or valve height until the water stops about 1 inch below the overflow tube.
- Flush several times and confirm the valve shuts off cleanly each time.
What Tools You Actually Need for This Job
You do not need much. Here is the honest list:
- Adjustable wrench (one is enough)
- Sponge and small towel (to soak up tank water)
- Small bucket (to hold water from the supply line)
- Replacement fill valve (purchase beforehand or after shutting off the water)
That is it. No soldering, no pipe cutting, no special skills. If you can tighten a nut and read a water line, you can replace a fill valve.
How Much Water Does a Running Toilet Actually Waste?
A running toilet is not just an annoyance. The water waste adds up faster than most people expect.
A slow leak through a faulty flapper can waste around 30 gallons of water per day. A fill valve that never fully shuts off can waste anywhere from 200 to 400 gallons daily, depending on how far it is from shutting off correctly. That figure is not an exaggeration. It comes from estimates consistently cited by plumbing industry sources and utility conservation programmes.
To put that in cost terms:
- United States: Average water rates sit around $0.004 to $0.006 per gallon. A toilet wasting 300 gallons a day adds roughly $3 to $5 to your daily bill, or $90 to $150 per month.
- United Kingdom: Water is typically billed by volume at around £0.003 per litre. At 300 gallons (roughly 1,135 litres), that is approximately £3.40 per day, or over £100 per month.
- Canada: Average rates vary by region but typically fall between $0.003 and $0.006 CAD per litre, placing a running toilet in the $100 to $200 CAD per month range.
- Australia: With water rates commonly between $2.00 and $3.50 per kilolitre, a toilet leaking 300 gallons (roughly 1.1 kilolitres) per day can add $65 to $115 AUD per month to your bill.
In other words, fixing a running toilet often pays for itself within the first week.
When to Call a Plumber Instead of Fixing It Yourself
Most running toilets are DIY-friendly. But there are situations where pushing ahead yourself could cost you more money than it saves.
Consider calling a plumber if:
- Your toilet keeps running after you have replaced both the flapper and the fill valve. If the basic parts are new and the problem persists, the issue is likely structural, such as a damaged flush valve seat that cannot seal the flapper properly.
- The overflow tube is cracked or broken. A cracked overflow tube cannot be patched reliably. It typically requires replacing the full flush valve assembly, which involves draining and partially removing the tank.
- You can see cracks inside the tank. Internal tank cracks are not a DIY repair. Water seeping through tank walls can cause floor damage or subfloor rot over time.
- The flush valve seat is visibly damaged. The flush valve seat is the part the flapper seals against. If it is chipped, warped, or corroded, no flapper will seal against it cleanly. A plumber will either resurface it with a repair kit or replace the flush valve entirely.
None of these scenarios is cause for alarm. They are just situations where the repair goes beyond part replacement and into mechanical reassembly. A licensed plumber can resolve any of these issues in a single visit, typically in under an hour.
How to Prevent Your Toilet From Running Again
Once you have completed your running toilet fix, a few simple habits will keep the problem from coming back.
Check the flapper once a year. Lift the tank lid and press down on the flapper with your finger. It should feel soft and flexible. If it feels stiff, brittle, or has visible cracks, swap it out. A $7 flapper once a year is far cheaper than a year of wasted water.
Stop using drop-in bleach tablets. These are extremely convenient but genuinely destructive to rubber parts. Bleach degrades the flapper and fill valve seals far faster than normal wear. Use a toilet brush and bowl cleaner instead. Your tank components will last years longer.
Use a water softener if you live in a hard water area. Mineral buildup on flappers and valve seats is one of the leading causes of premature wear. A softener or a periodic descaling treatment inside the tank (a cup of white vinegar, left overnight, then flushed) keeps deposits from accumulating.
Set a reminder to inspect the refill tube once a year. It costs nothing and takes 30 seconds. A quick look confirms it is positioned correctly and has not slipped down into the overflow pipe.
These are not demanding tasks. A five-minute annual check of your toilet tank is genuinely all it takes to catch problems early and avoid unnecessary water bills.
Conclusion
A toilet that keeps running after flushing is almost always something you can fix yourself, usually in under an hour, and often for less than the cost of a meal. Start by lifting the tank lid and taking a good look. Run the dye test if you are unsure whether the flapper is leaking. Try the simple adjustments before buying any parts. Replace the flapper first if the adjustment does not solve it, then the fill valve if needed.
The problem is rarely as complicated as it sounds. Most of the time, it comes down to a $7 rubber seal or a 30-second float adjustment.
If you found this guide useful, the next article in this series covers more beginner-friendly home repairs that follow the same principle: inspect first, try the simple fix, and call in help only when the job genuinely needs it. There is a lot you can handle yourself.