How to Patch a Small Hole in Drywall Without Special Tools
You hung a picture, moved out of your old room, or accidentally knocked something into the wall. Now there’s a small hole staring back at you, and you’re wondering how much this is going to cost to fix.
- What Counts as a “Small” Hole in Drywall?
- Nail Holes and Tack Marks
- Dents, Dings, and Scuffs Without Full Penetration
- Small Anchor Holes (Up to 1/2 Inch)
- Supplies You Need to Patch a Small Hole in Drywall Without Special Tools
- How to Patch a Small Hole in Drywall Step by Step
- Step 1 — Clean and Prep the Hole
- Step 2 — Apply the First Coat of Spackle
- Step 3 — Let It Dry Completely
- Step 4 — Sand the Patch Smooth
- Step 5 — Apply a Second Coat If Needed
- How to Match Paint After Drywall Repair
- Finding Your Wall’s Existing Paint Colour
- How to Apply Touch-Up Paint Without Brush Marks
- What to Do When the Touch-Up Still Shows
- Common Mistakes That Make Drywall Patches Look Worse
- Overfilling the Hole
- Skipping the Second Coat
- Sanding Too Early or Too Aggressively
- Painting Over Unpainted Spackle
- Tips for Renters Repairing Walls Before Moving Out
- What Landlords Usually Consider Normal Wear and Tear
- Documenting Your Repairs
- When to Call the Landlord Instead of DIYing
- How This Repair Fits Into Basic Home Maintenance Skills
- Conclusion
Here’s the thing: you can patch a small hole in drywall without special tools, and you probably already have everything you need. No professional kit. No expensive equipment. Just a few basic supplies and about 30 minutes of actual effort.
This guide walks you through the entire process from start to finish — choosing the right filler, applying it correctly, sanding it smooth, and touching up the paint so the repair practically disappears. Whether you’re a renter trying to get your deposit back or a first-time DIYer tackling your first wall repair, this is the right place to start.
What Counts as a “Small” Hole in Drywall?
Before you grab the spackle, it helps to know whether your damage actually falls into the “small” category. Not every hole gets fixed the same way, and using the wrong method wastes time and materials.
For this guide, a small hole is anything up to about half an inch in diameter. That includes nail holes, tack marks, small dents, and the kind of rough circles left behind by plastic wall anchors. These repairs require no backing support, no mesh patch, and no drywall screws.
A medium hole (roughly half an inch to four inches) is a different repair. It usually needs a backing piece or a self-adhesive mesh patch to give the filler something to grip. A large hole — anything close to fist-sized or bigger — typically requires a proper drywall patch cut and secured to wall studs. That’s a different skill set entirely, and outside the scope of what we’re covering here.
Nail Holes and Tack Marks
Nail holes are the most common thing renters deal with. Picture hooks, finish nails, and thumbtacks all leave small, relatively clean punctures, usually less than an eighth of an inch wide and shallow in depth.
These are the easiest repairs in the entire category. The hole is narrow, the edges are clean, and a single coat of lightweight spackle is often all it takes. If this is what you’re working with, the process ahead is genuinely quick.
Dents, Dings, and Scuffs Without Full Penetration
Sometimes the wall doesn’t have a hole at all — it has a dent. A chair bumped into it, a door swung too hard, or something heavy pressed against the surface and crushed the drywall paper inward without piercing all the way through.
These repairs still need filler. Even though nothing went through the wall, the dent catches light differently than the flat surface around it. Once paint goes on, it can make the damage more visible, not less. A thin coat of spackle, sanded smooth, solves the problem.
Small Anchor Holes (Up to 1/2 Inch)
Wall anchors — the plastic or metal inserts used to hold screws in drywall without a stud — leave behind a wider, rougher hole when removed. The edges are often jagged or slightly torn, and the diameter is typically a quarter to half an inch.
These repairs still fall comfortably within the no-special-tools category. They just need a little more care. The rougher edges need to be cleaned up first, and the hole usually benefits from two thin coats of spackle instead of one. Give each coat time to dry fully, and the result will be just as clean as a nail hole repair.
Supplies You Need to Patch a Small Hole in Drywall Without Special Tools
One of the best things about this type of wall repair is the cost. For most small holes, you can get everything you need for under ten dollars — and if you already have sandpaper and an old knife in a drawer somewhere, the total cost might be zero.
Here’s what you need:
- Lightweight spackle (a small tub, widely available at hardware and home improvement stores)
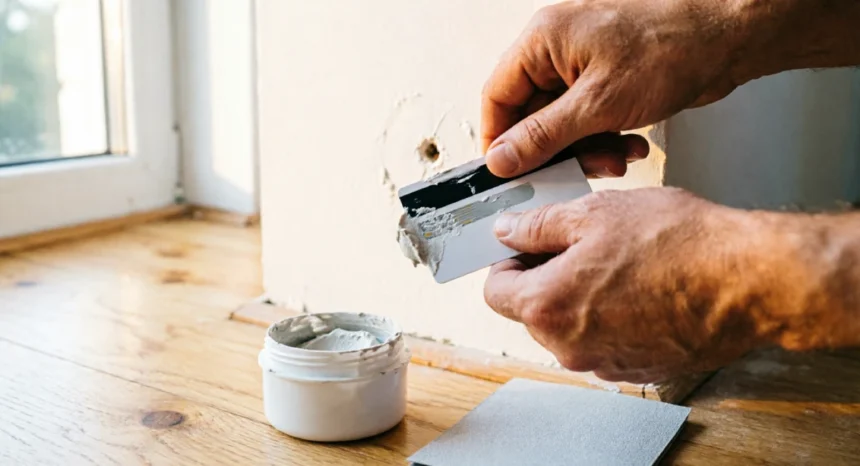
- A spreading tool (a butter knife, an old credit card, or a stiff piece of cardboard)
- Fine-grit sandpaper (120 to 220 grit)
- A dry cloth or paper towel for prep
- A slightly damp cloth for cleanup after sanding
- Paint and a small applicator for the finish (covered in detail later)
That’s the full list. No putty knife, no sanding block, no mixing tray.
Spackle or Lightweight Joint Compound — Which to Use?
These two products are often shelved near each other, and both work for small repairs, but they behave differently.
Lightweight spackle is the better choice for the holes this guide covers. It dries fast (usually within one to two hours for small applications), shrinks less than standard joint compound, and is easy to sand. wide varieties, dry pink and turn white when ready, which takes the guesswork out of timing.
All-purpose joint compound dries more slowly and is thicker in consistency. It’s better suited for slightly larger repairs or finishing work around seams. For nail holes and small anchor repairs, it’s more than you need, and the longer dry time adds unnecessary waiting.
Stick with lightweight spackle. A small tub costs around three to five dollars and will handle dozens of small repairs.
What to Use Instead of a Putty Knife
A putty knife is convenient, but it’s not something most renters keep on hand. The good news is that spreading spackle over a small hole doesn’t require a dedicated tool.
Three alternatives work well:
- A butter knife from your kitchen drawer: Hold it at a low angle — roughly 30 degrees — and use the flat of the blade to press spackle into the hole, then drag it across the surface in one smooth pass.
- An old credit card or loyalty card: Flexible enough to conform slightly to the wall surface. Hold it flat against the wall and drag it across the hole with steady pressure.
- A stiff piece of cardboard: Cut to a straight edge and used the same way as a credit card. Works surprisingly well for a single repair.
The key with any of these is to keep the angle low and apply pressure toward the wall. You’re pressing the spackle in, not just smearing it across the top.
How to Patch a Small Hole in Drywall Step by Step
This section is the core of the repair. Follow each step in order and don’t skip ahead. Rushing one stage almost always creates more work in the next.
Step 1 — Clean and Prep the Hole
Before any spackle goes on, the hole needs to be clean and dry. Run your fingertip around the edges and remove anything loose: bits of torn drywall paper, dust, small fragments, or the remnant of a nail tip that didn’t come out flush.
If the nail is still partially in the wall, press it fully in or pull it out completely. A nail tip sitting just below the surface will push back through the spackle as it dries.
Wipe the area with a dry cloth to remove dust. Spackle bonds best to a clean, dry surface. If the area is damp for any reason, let it air out before you start.
This step takes about two minutes and makes a real difference in how well the spackle adheres.
Step 2 — Apply the First Coat of Spackle
Open your spackle and scoop out a small amount with your spreading tool. For a nail hole, you need less than you think — roughly the size of a pea or slightly larger.
Press the spackle firmly into the hole. The goal is to fill the space inside the wall, not just cover the surface. Use short, firm strokes, pushing the material in before spreading it across.
Once the hole is filled, draw your tool across the patch in one smooth pass to remove the excess and leave the surface as flat as possible. You want a slightly raised area above the wall surface — maybe 1 to 2 millimetres — to account for shrinkage as it dries. Don’t try to make it perfectly flat at this stage.
The smoother your first coat, the less sanding you’ll need later.
Step 3 — Let It Dry Completely
Walk away. This is the step most people rush, and it causes the most problems.
Lightweight spackle typically dries within one to two hours for small repairs at normal room temperature. In humid conditions, or in a bathroom where moisture hangs in the air, allow closer to three to four hours.
If you’re using a pink-to-white spackle, the colour change is your reliable signal. Don’t sand until the patch is fully white across the entire surface. A patch that looks mostly white but still has a pink centre is not done yet.
Touching or sanding a patch that hasn’t dried fully will pull the spackle out of the hole and leave a torn, uneven surface that’s harder to fix than the original damage.
Step 4 — Sand the Patch Smooth
Tear off a small piece of fine-grit sandpaper (120 to 220 grit) and wrap it around one or two fingers. This gives you enough control to sand the patch area without pressing too hard on the surrounding wall.
Use small circular motions over the patch. The goal is to bring the filled area flush with the wall surface. Run your finger across the repair after every few passes. Your fingertip is more sensitive than your eyes here — it will catch ridges and high spots that look flat under direct light but feel raised.
Once the surface feels smooth and flush, wipe away the dust with a slightly damp cloth. Let it dry for a few minutes before painting.
Don’t oversand. You’re not trying to grind the spackle down; you’re just levelling it to the wall.
Step 5 — Apply a Second Coat If Needed
After sanding and stepping back for a look, you might notice a slight depression where the patch is. This is normal. Lightweight spackle shrinks as water evaporates during drying, and the first coat often settles slightly below the wall surface.
If the patch looks recessed, apply a second thin coat using the same method as the first. This coat should be thinner than the first — you’re filling a much smaller gap now.
Let it dry fully, sand again lightly, and check once more. Most small holes need no more than two coats. Anchor holes might occasionally need a third, but that’s uncommon if the first two were applied correctly.
How to Match Paint After Drywall Repair
A perfect spackle job can still look obvious if the paint doesn’t match. This is where a lot of renters get frustrated. The actual repair is flawless, but the patch shows up as a slightly different colour or sheen. Here’s how to handle it correctly.
Finding Your Wall’s Existing Paint Colour
Start by checking whether leftover paint was stored with the property. Look in the garage, a utility closet, under the sink, or on a shelf in a storage room. Many landlords or previous occupants leave a labelled tin behind for exactly this purpose.
If no paint is available, take a paint chip to a hardware store. Use a coin or a flat tool to scratch a small piece of paint from an inconspicuous area — inside a closet or behind a door are good spots. Most major hardware stores offer free colour matching using a spectrometer. Bring the chips in,n, and they’ll mix a matching pot, often in a small sample size.
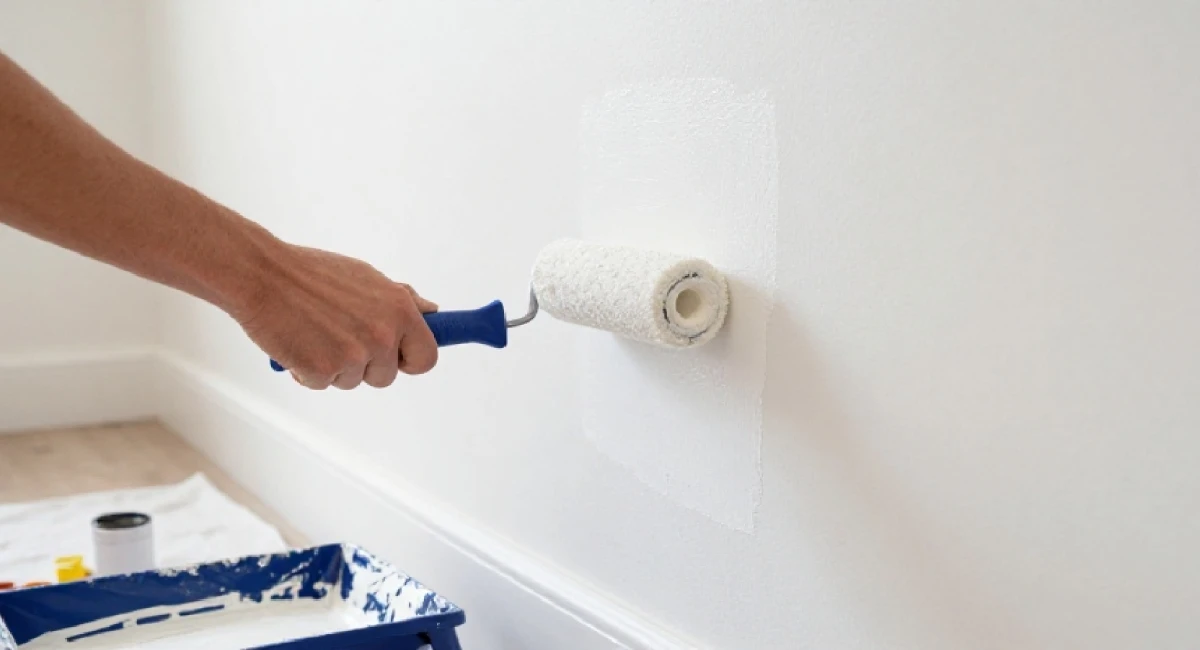
How to Apply Touch-Up Paint Without Brush Marks
A hard-bristle paintbrush is often the first thing people reach for, but it tends to leave streaks that make the touch-up visible rather than hiding it.
A small foam roller or a piece of lint-free cloth works better for small areas. Apply paint lightly and blend outward from the centre of the patch in overlapping passes. The goal is a gradual fade into the surrounding wall, not a defined edge.
Apply two thin coats rather than one thick one. Let the first coat dry before adding the second. Thin coats blend better and dry more evenly.
What to Do When the Touch-Up Still Shows
If the colour matches but the touch-up still shows, you’re likely dealing with a sheen mismatch. Paint that’s been on a wall for a year or more loses some of its sheen through UV exposure, dust, and cleaning. New paint applied over it will look slightly brighter or more reflective, even with the same colour formula.
The most reliable solution is to repaint the full wall section between two natural boundaries — corner to corner, or corner to door frame. This creates a clean, even finish across the entire surface and eliminates the visual edge where new paint meets old.
It takes more time than a spot touch-up, but for renters who want their deposit back, it’s often the cleanest path.
Common Mistakes That Make Drywall Patches Look Worse
Most failed drywall repairs come down to four consistent mistakes. Each one is avoidable once you know what to look for.
Overfilling the Hole
Using too much spackle is an instinct — it feels like more material means a better fill. In practice, it creates a raised mound that’s very difficult to sand flush without also sanding through to the surrounding wall surface.
The correct amount for a nail hole is about the size of a small pea. Press it in firmly, then spread the minimal excess across the surface. If you’ve already overfilled, act quickly. While the spackle is still wet, use a damp cloth to wipe away the excess and re-smooth the surface. Once it dries hard, you’ll be sanding for a long time.
Skipping the Second Coat
A single coat often looks perfect when it’s wet. Then it dries, and a small dimple appears in the centre where the spackle shrank. Painting over that dimple makes it worse, not better — paint catches light at a slightly different angle in the depression and draws the eye straight to it.
After your first coat dries and you’ve sanded it, look at the patch from a low angle with a light source to one side. This raking light reveals surface variations that look invisible under straight-on lighting. If you see a dip, apply the second coat before painting.
Sanding Too Early or Too Aggressively
Sanding spackle before it’s fully dry pulls material out of the hole instead of smoothing the surface. You’ll end up with a torn, uneven patch that needs to be cleaned out and started again.
Equally, pressing too hard while sanding — or using a coarser grit than needed — damages the thin paper layer on the surrounding drywall. This creates fuzzing and texture differences that show through paint. Use 120 to 220 grit, light pressure, and let the sandpaper do the work rather than forcing it.
Painting Over Unpainted Spackle
Bare spackle is porous. It absorbs paint at a different rate than the painted wall around it, which creates a dull, flat spot even when the colour is a perfect match. The surrounding wall has a layer of sealed paint that reflects light slightly differently than raw spackle.
The fix is simple: apply a thin primer coat before your touch-up paint. If you don’t have primer, diluted white paint (roughly 80% paint, 20% water) brushed lightly over the spackle and left to dry creates a basic seal. This gives the touch-up paint a consistent base to sit on.
Tips for Renters Repairing Walls Before Moving Out
Wall repairs are one of the most common sources of dispute between renters and landlords at the end of a tenancy. Knowing what’s expected of you, what’s not, and how to protect yourself makes the process much less stressful.
What Landlords Usually Consider Normal Wear and Tear
Most rental agreements and tenancy laws in English-speaking countries distinguish between two categories of wall damage: normal wear and tear, and damage.
Small nail holes from picture hanging generally fall under normal wear and tear. They’re the result of ordinary, reasonable use of the property and, in many jurisdictions, cannot legally be deducted from a security deposit. A few nail holes in a wall that was occupied for a year or more are expected.
Larger holes, torn drywall, deeply gouged surfaces, or anchor damage that goes beyond minor are typically classified as damage and may be chargeable. If you’re uncertain about your specific situation, check your tenancy agreement or look up the relevant rules in your local jurisdiction.
That said, filling small holes costs almost nothing and takes very little time. Even if you’re not legally obligated, doing the repairs demonstrates good faith and often leads to a smoother move-out process.
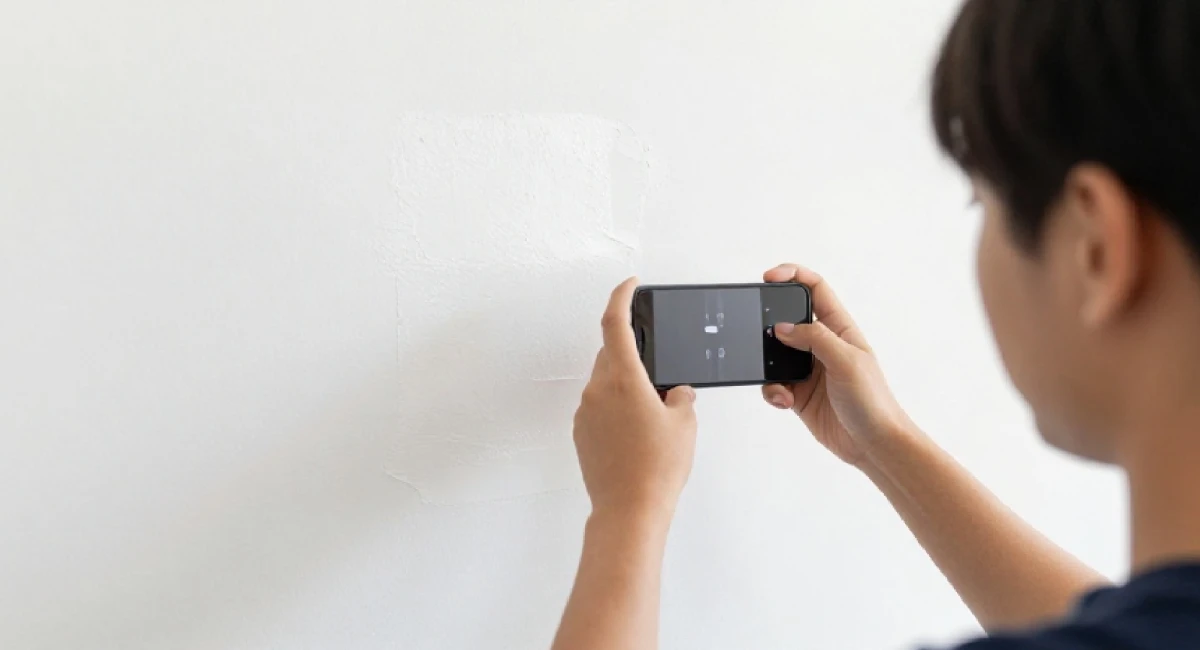
Documenting Your Repairs
Before you start any repair, take a photo of the damage. After the repair is complete and the paint is dry, take another photo of the same spot. Do this for every hole you patch.
Timestamped smartphone photos stored in a folder labelled with the property address give you clear, dated evidence that you addressed the damage yourself. If a landlord later claims the wall was in poor condition, you have a visual record showing the state you left it in.
This takes about 30 seconds per repair and costs nothing. It’s one of the most practical things a renter can do before handing back the keys.
When to Call the Landlord Instead of DIYing
Not every wall problem should be fixed by the renter, and some repairs can create liability if handled incorrectly.
Contact your landlord or property manager instead of patching it yourself if:
- The hole is larger than a fist or has rough, torn edges extending well beyond a half inch
- There is discolouration, soft spots, or a damp smell around the damage (possible water leak behind the wall)
- The damage is near an electrical outlet or switch
- You suspect the damage was pre-existing and not caused by your tenancy
Attempting a DIY patch on damage that has an underlying cause — like a slow leak behind the wall — can delay proper repairs and potentially make you responsible for additional damage. When in doubt, report it in writing and let the landlord decide.
How This Repair Fits Into Basic Home Maintenance Skills
Wall patching is a small repair, but the skills it builds are used across a wide range of basic home maintenance tasks. Once you’ve done it once, you’ll notice the same steps appearing in other repairs you tackle.
Skills You Build From This One Repair
The core sequence of this repair is: prep the surface, apply filler, let it cure, sand it smooth, and finish the surface. That same sequence appears in:
- Caulk repairs around windows, bathtubs, or door frames (apply, smooth, let cure, finish)
- Wood filler projects on furniture or trim (fill the gap, let dry, sand flush, stain or paint)
- Minor concrete or tile repairs where a filler compound replaces chipped material
Learning to read when a material is dry, how much pressure to use while sanding, and how to blend a finish into an existing surface are genuinely transferable. These aren’t drywall-specific instincts — they’re general repair skills.
What to Tackle Next After Wall Repair
Once you’ve patched a wall, a few natural next steps follow in the beginner DIY sequence:
Fixing squeaky hinges is a good follow-up. It requires even fewer materials (a screwdriver and a little lubricant) and teaches you to diagnose a mechanical problem before throwing solutions at it. The same deliberate, methodical approach you used on the wall applies here.
Patching a window screen introduces you to working with flexible materials and making clean cuts. It’s a slightly different skill set, but it builds the same confidence in tackling minor home damage rather than ignoring it.
Sealing gaps around outlets and switch plates uses caulk instead of spackle, but the application technique is very similar. You’re filling a gap, smoothing the surface, and blending a finish — the same core actions as a drywall patch.
For a full overview of the easiest home repairs for beginners to learn first, including these repairs and several others, check out the main guide in this series.
Conclusion
Knowing how to patch a small hole in drywall without special tools is one of the most practical repairs a renter or first-time DIYer can learn. The materials cost almost nothing, the process takes less than a day when you account for drying time, and the result — when done carefully — is a wall that looks like the hole was never there.
Clean the area, fill it with lightweight spackle using whatever flat edge you have on hand, let it dry fully, sand it smooth, and finish with a well-matched paint touch-up. That’s the whole process.
If something doesn’t look right the first time, it’s almost always fixable. A low second coat, a light re-sand, or a second round of touch-up paint usually solves it. The skills get easier every time you use them.
Give it a try before your next move-out inspection — or just the next time you notice a nail hole that’s been bothering you. You’ll have it sorted in an afternoon.