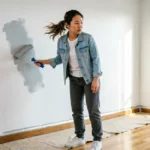
How to Install Peel and Stick Backsplash Tiles the Easy Way
You want a fresh kitchen look, but you do not want to hire a contractor, mix grout, or lose your security deposit. That is exactly the problem peel-and-stick backsplash tiles were made to solve.
- What Are Peel-and-Stick Backsplash Tiles?
- Tools and Materials You Need Before You Start
- How to Prepare Your Surface Before Installing Adhesive Backsplash Tiles
- How to Measure Your Backsplash Area Accurately
- Step-by-Step Guide to Installing Peel and Stick Backsplash Tiles
- How to Handle Corners and Edges
- How to Cut Tiles Around Outlets, Switches, and Fixtures
- How to Keep Your Pattern Aligned Across the Entire Wall
- Common Mistakes to Avoid When Installing Kitchen Wall Tiles
- Tips for a Cleaner, More Professional-Looking Finish
- How to Remove Peel and Stick Tiles Without Damaging Your Wall
- How Long Do Peel-and-Stick Backsplash Tiles Last?
- Conclusion
This guide walks you through how to install peel-and-stick backsplash tiles from the very first measurement to the final pressed edge — no prior experience needed, no specialist tools required. Whether you rent your home or simply want a weekend upgrade, the process is straightforward when you follow the right order.
The difference between tiles that look great for years and tiles that start peeling in a month comes down to a few key steps most beginners skip. This guide covers all of them.
What Are Peel-and-Stick Backsplash Tiles?
Peel-and-stick backsplash tiles are thin, self-adhesive panels designed to look like ceramic, subway, mosaic, or stone tile — without the installation work that real tile demands. The back of each panel is coated with a pressure-sensitive adhesive protected by a paper or plastic liner. You peel the liner off and press the tile directly onto the wall.
They come in several material types:
- Vinyl — the most affordable and widely available option, flexible and easy to cut
- PVC — thicker and more durable than standard vinyl, holds its shape well
- Gel — has a slightly raised, three-dimensional surface that mimics real grout lines closely
- Metal-look — usually aluminum or stainless steel finish panels, popular for modern kitchens
Traditional grouted tile requires adhesive mortar, tile spacers, grout, and sealing. Peel-and-stick tile skips all of that. The trade-off is that it is not as heat-resistant or as permanent, but for most backsplash areas, that trade-off is completely reasonable.
Pricing typically ranges from around $5 to $25 per square foot, depending on material and brand, which is well below the cost of professional ceramic tile work.
Who Should Use Them?
These tiles are ideal for renters who cannot make structural changes to their walls, beginners with zero tiling experience, and homeowners who want a quick visual refresh without committing to a full renovation.
They work well in kitchens, laundry rooms, and lower-humidity bathroom areas. However, they are not the best choice for areas with constant steam or standing moisture — directly above a stovetop or right beside a shower, for example, will shorten their lifespan significantly.
If you need a reversible, budget-friendly, and genuinely manageable upgrade, these tiles are built for you.
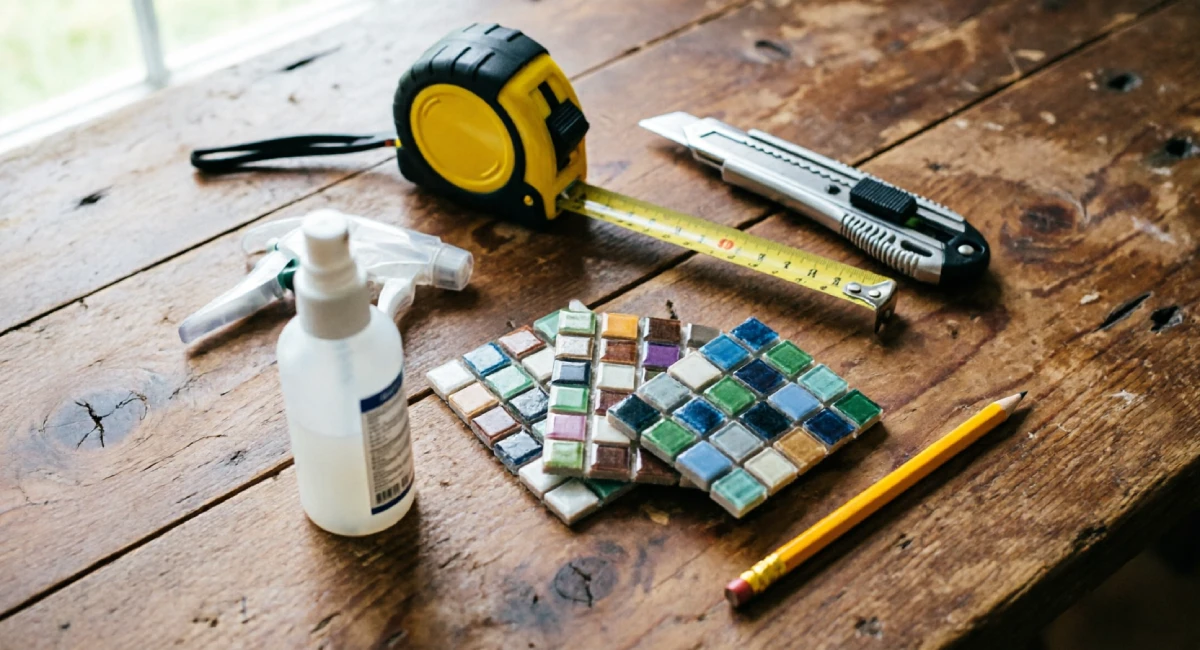
Tools and Materials You Need Before You Start
Getting your tools together before you start is not just a good habit — it prevents you from abandoning the job halfway through to find a pencil or run to the hardware store.
Here is everything you need:
- Measuring tape
- Pencil
- Long level or laser level
- Utility knife and extra blades (or scissors for flexible vinyl panels)
- Metal straight edge or ruler
- Painter’s tape
- Isopropyl alcohol or a kitchen degreaser
- Clean cloths or paper towels
- The tiles themselves (with 10-15% extra for cuts and waste)
- Optional: a tile roller or wallpaper seam roller for stronger adhesion
The roller is worth picking up if you can find one cheaply. Pressing tiles by hand leaves uneven pressure, especially along the edges. A roller closes those gaps properly.
Do not start until everything on this list is within reach. Mid-installation interruptions are one of the easiest ways to end up with a crooked row.
How to Choose the Right Tiles for Your Space
Not all peel-and-stick tiles are created equal, and the wrong product choice is hard to fix once it is on the wall.
Look for these things before buying:
- Panel size — larger panels mean fewer seams and faster installation, but they are harder to handle in small spaces
- Pattern repeat — tiles with a repeating pattern need careful alignment; check the product description for the repeat measurement.
- Material thickness — Thicker PVC or gel tiles generally hold up better to heat and moisture
- Heat and moisture ratings — check the product specs if you are installing near a stovetop or in a bathroom.
Read product reviews specifically for mentions of adhesive strength and peeling. A tile that looks great in photos but gets two-star reviews for falling off the wall is not worth buying, regardless of the price.
How to Prepare Your Surface Before Installing Adhesive Backsplash Tiles
Surface preparation is the single most important part of this entire process. If the wall is not properly cleaned and ready, even the best quality tiles will start peeling within weeks.
There are four steps to prep your surface correctly:
1. Clean off grease and residue. Kitchen walls collect invisible grease from cooking fumes. Even a wall that looks clean to the eye can have a thin oily film that prevents adhesion. Spray the entire area with a kitchen degreaser or isopropyl alcohol and wipe it down thoroughly. Do not use regular dish soap — it leaves a residue that is just as bad as the grease.
2. Let the surface dry completely. This sounds obvious, but many people rush it. Any moisture trapped between the tile and the wall will break down the adhesive. Give the wall at least 30 to 60 minutes after cleaning before you touch a single tile.
3. Repair uneven areas. If there are bumps, chips, or loose existing tiles on your wall, fix them first. Peel-and-stick tiles do not bond well over uneven surfaces, and any raised area will create a visible bubble or edge.
4. Prime if necessary. If your wall has a flat or matte-finish paint or if the surface is porous, apply a thin coat of primer and let it cure fully before installing. Flat paint has very little surface hardness, which means the adhesive can pull the paint off the wall when you eventually remove the tiles.
Skipping any of these four steps is the number one reason tiles fail. The prep takes maybe 45 minutes — it is always worth the time.
Which Surfaces Work Best — and Which to Avoid
Peel-and-stick tiles bond well to:
- Smooth painted drywall (eggshell or semi-gloss finish)
- Existing ceramic or porcelain tile
- Fiberglass panels
- Glass surfaces
They do not bond reliably to:
- Textured or rough walls
- Flat or chalk-finish paint
- Uneven brick or stone
- Areas with active moisture, such as directly behind a sink faucet
Here is a quick test before you commit: press a piece of painter’s tape firmly onto the wall, then pull it off quickly. If it brings paint with it, the surface needs priming before any tile goes up. If the tape pulls off cleanly, the wall is likely ready.
How to Clean and Dry the Wall Properly
Start with a degreaser or isopropyl alcohol (70% concentration works well). Spray the wall, wipe in straight horizontal strokes, then wipe again with a fresh dry cloth.
Avoid dish soap, multi-surface spray cleaners that leave a shine, or anything described as “moisturizing” — all of these leave a film behind.
After cleaning, leave the wall alone for at least 30 to 60 minutes. The surface should feel completely dry and slightly rough to the touch, not smooth or slick. If it still feels smooth after drying, clean it again.
How to Measure Your Backsplash Area Accurately
Measuring accurately before you buy saves money and frustration. The basic formula is simple:
Width x Height = Total area, then multiply by 1.15
The 1.15 multiplier gives you a 15% buffer for cuts, waste, and the occasional mistake. Never order the exact square footage you need — you will almost certainly come up short.
When measuring, treat each section of wall separately. A wall with a window or electrical outlet in it should be broken into segments. Measure each segment and add them together.
For areas around outlets and corners, include those in your total measurement even though you will be cutting around them. The offcuts from those sections will not be reusable as whole tiles in most cases.
Write your measurements down. Do not trust your memory between the kitchen and the hardware store.
Planning the Layout Before Peeling Anything
Before you peel a single tile, do a dry run. Hold tiles up against the wall without removing the backing and see how the cuts will fall at each edge.
The goal is to find the visual centre of the wall and start there, working outward in both directions. This way, any cut tiles at the left edge and right edge will be roughly equal in size, which looks intentional. Starting from one corner and working across means one side gets a full tile and the other side gets a sliver, which looks unplanned.
Mark the centre point with a pencil and use it as your anchor. A few minutes of planning here prevents a result that looks uneven once all the tiles are up.
Step-by-Step Guide to Installing Peel and Stick Backsplash Tiles
Follow these steps in order and work slowly, especially on your first row.
Step 1 — Mark a level horizontal starting line. Use a long level and pencil to draw a perfectly horizontal line across the wall at the height where your first row of tiles will sit. This line is your guide. If this line is not level, every row above it will be crooked.
Step 2 — Peel the backing slowly from one corner. Do not peel the entire backing off at once. Start from one corner of the tile, peel back about a quarter of the backing, and position that corner precisely on your starting line. Use that corner as your anchor before committing the rest of the tile to the wall.
Step 3 — Press from the centre outward. Once the tile is positioned, press the centre firmly against the wall first, then smooth outward toward the edges. This pushes air out rather than trapping it in the middle.
Step 4 — Use a tile roller or credit card for firm contact. After pressing by hand, go over the entire tile surface with a roller or the edge of a credit card. Pay extra attention to the corners and edges, which are the first areas to lift.
Step 5 — Butt each tile tightly against the last. Place each new tile directly against the edge of the previous one with no visible gap. Most tiles have a printed grout line built into the design, so a tight seam will look like a natural grout joint once they are all in place.
Step 6 — Check alignment with a level after every two rows. Do not wait until you are six rows up to check whether things are still straight. Check every two rows. Catching a drift early means lifting one tile — catching it late means lifting ten.
How to Handle Corners and Edges
Inside corners (where two walls meet) are handled by overlapping the tile from one wall slightly onto the adjacent wall, then trimming the overlap with a utility knife and straight edge for a clean join.
Outside corners (a protruding wall edge) are handled by wrapping the tile around the corner and pressing it firmly onto both faces. The flexibility of vinyl and PVC tiles makes this easier than it sounds.
At the bottom edge where the tile meets the countertop, leave the last row of tiles pressed firmly in place, then run a thin bead of clear silicone caulk along the bottom seam. This creates a water-resistant barrier and gives the installation a finished, professional look.
How to Cut Tiles Around Outlets, Switches, and Fixtures
Important: turn off the power to any electrical outlets or switches before working near them.
For straight cuts along edges, score the tile firmly with a utility knife and a metal straight edge, then snap or cut fully through. Replace your blade frequently — a dull blade drags and tears rather than cuts cleanly.
For outlet cutouts, hold the tile up to the wall and mark the four corners of the outlet box on the tile face with a pencil. Connect those marks, then cut along the lines with a utility knife or scissors. A few test fits are normal — trim a little at a time until the cutout fits cleanly around the fixture.
Flexible vinyl panels can be cut with sharp scissors for curved or less precise cuts, which is faster and easier than a knife for simple shapes.
How to Keep Your Pattern Aligned Across the Entire Wall
Tile patterns drift. If you are installing a geometric or repeating mosaic pattern, the design can shift slightly with every tile if you are not actively checking it.
Use a long level or laser level across the wall every three to four rows. This catches any upward or downward drift before it becomes noticeable.
If you press a tile into place and immediately notice it is slightly off, you have a small window to fix it. The adhesive on most peel-and-stick tiles is repositionable for the first two to five minutes after placement. Lift the tile carefully from one corner, reposition, and press again. After that window closes, the bond starts to firm up and lifting the tile risks stretching or tearing it.
Common Mistakes to Avoid When Installing Kitchen Wall Tiles
Most problems that show up after installation were caused before the first tile was placed. Here are the mistakes that come up most often:
When installing on a dirty or damp wall, you press the tile on, it looks fine for a week, then one corner starts lifting. Nine times out of ten, the wall was not clean enough. The fix is cleaning properly and waiting for the surface to dry fully before starting.
Skipping the level line, one person starts from the corner, thinking their countertop is level. Three rows up, the whole installation is visibly tilted. Always draw a level line first, regardless of how straight the countertop or cabinet edge looks.
Rushing the pressing step. A tile pressed quickly with light pressure will look stuck, but will not have a firm bond. Spend ten to fifteen seconds on each tile, pressing firmly across the entire surface. The adhesive needs sustained pressure to activate fully.
Not checking pattern alignment regularly, a pattern that drifts by just a few millimetres per row looks seriously crooked by row eight. Check alignment every two rows without skipping.
When buying the exact square footage you need, tiles get cut, trimmed, and occasionally ruined. Buy 10 to 15% more than your measurements call for. Running out of tiles mid-wall and finding the product is out of stock is a genuinely frustrating situation to be in.
Why Tiles Peel and How to Prevent It
Peeling is the most common complaint about peel-and-stick backsplash tiles, and it almost always has one of three causes:
Poor surface prep — grease, dust, or moisture on the wall prevents a real bond. Clean the surface thoroughly with a degreaser or isopropyl alcohol and let it dry completely.
Low temperature during installation — adhesives become less effective below around 16 degrees Celsius (60 degrees Fahrenheit). If the room is cold, let it warm up before you start. Never install in a cold garage or unheated space in winter.
Insufficient pressing pressure — pressing lightly is not enough. Use a roller or credit card and apply firm, even pressure across every centimetre of the tile surface, paying extra attention to corners and edges.
Address all three causes, and peeling becomes very unlikely.
Tips for a Cleaner, More Professional-Looking Finish
The difference between an installation that looks store-bought and one that looks like a weekend DIY job comes down to a few small details.
Keep grout line spacing consistent. Most tile panels have a printed grout line built in, but where panels meet, the grout line can widen or narrow. Align panel edges carefully so the seam looks like a continuation of the pattern, not a visible gap.
Use a metal straight edge for every cut. Cutting freehand produces uneven edges that are visible once the tile is on the wall. Even a quick cut looks cleaner when it is guided.
After installation, wipe down the entire surface with a barely damp cloth to remove fingerprints, pencil marks, and adhesive smudges. The final surface should be clean before you step back and evaluate the result.
Finish by running a thin bead of clear silicone caulk along the bottom edge where the tiles meet the countertop. This seals the seam against water, prevents moisture from getting behind the tiles, and gives the whole installation a polished edge.
How to Make the Installation Look Like Real Tile
A few deliberate choices at the buying and planning stage make peel-and-stick tile look much closer to the real thing.
Choose a tile with a realistic grout-line print that includes slight colour variation, not a flat grey line. Flat, uniform grout lines read as printed rather than real.
Use an offset layout pattern (also called a brick layout) where each row shifts half a tile length to the side. A straight stack pattern where every row lines up perfectly is harder to execute without visible misalignment, and it also looks more obviously like sheet tile.
Select a tile panel size that is proportional to your wall. A small kitchen wall looks better with smaller mosaic-style panels. A large kitchen island backsplash benefits from larger tiles that reduce the number of visible seams.
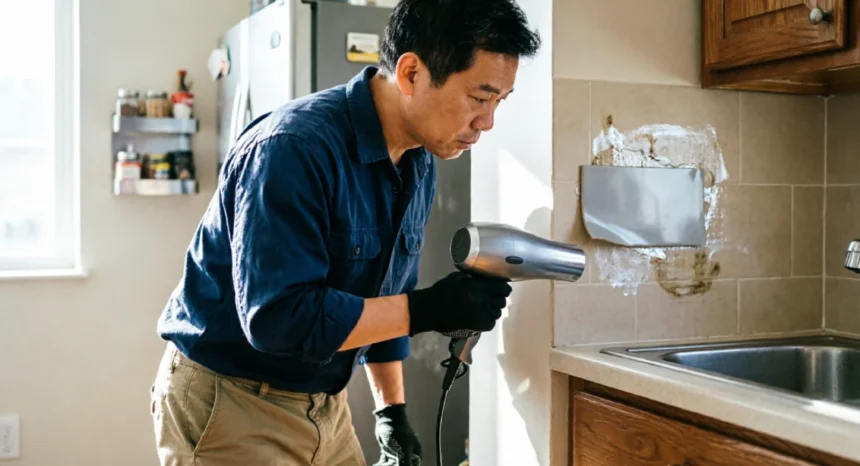
How to Remove Peel and Stick Tiles Without Damaging Your Wall

Removal is straightforward when done carefully, which is good news for renters.
Start with a hair dryer or heat gun set to low. Hold it about five to eight centimetres from the tile surface and move it slowly across the area for 20 to 30 seconds. The heat softens the adhesive and makes the tile much easier to lift without tearing.
Starting at a corner, slide a flat plastic card or your fingernail under the edge and peel back slowly at a low angle, roughly 20 to 30 degrees from the wall. Do not pull straight out at a right angle — that puts too much stress on the wall surface and is more likely to pull paint off.
Once the tile is removed, there will likely be adhesive residue left on the wall. Spray it with isopropyl alcohol or a citrus-based adhesive remover and let it sit for a minute before wiping with a cloth. Work in small sections rather than trying to remove all the residue at once.
If the wall paint looks old or thin, test the heat-and-peel method on one corner tile first before working across the whole area.
Will They Damage Painted Walls?
The straightforward answer is: usually not, if the wall has the right finish and the tiles are removed carefully.
Walls painted with eggshell or semi-gloss paint have a harder surface that resists damage during removal. Flat or matte-finish paint is softer and more likely to come off with the adhesive, which is why priming is recommended before installation on those surfaces.
If you are renting, photograph the wall before you put any tiles up. This document outlines the original condition and protects you if there is any dispute when you move out. Choose tiles from brands that specifically advertise “renter-safe” or “removable” adhesive if that is a concern — the adhesive formulas do vary meaningfully between products.
How Long Do Peel-and-Stick Backsplash Tiles Last?
A quality peel-and-stick tile installed on a properly prepared surface in a low-moisture area can last three to seven years without any problems. Some hold up longer than that in ideal conditions.
The factors that shorten lifespan most quickly are:
- Regular exposure to steam (above a stovetop without a range hood)
- High humidity over time (a bathroom without good ventilation)
- Direct heat from cooking
- Low-quality products with weak adhesive
PVC and gel tiles generally outlast standard vinyl alternatives. They are thicker, more rigid, and their adhesive tends to be more heat-resistant. If longevity is a priority, it is worth paying a little more for a product with better material ratings.
In a well-ventilated kitchen used for everyday cooking, a mid-range to quality tile should give you several years of reliable performance.
Conclusion
Installing peel-and-stick backsplash tiles is one of the most approachable home projects a beginner can take on. The tools are basic, the materials are affordable, and the results can look genuinely impressive when you follow the right steps.
The process comes down to four things done well: a clean, properly prepared surface; accurate measurements with enough extra tile to cover cuts; careful alignment from the very first row; and firm, even pressure on every tile you place.
If you take those four steps seriously, you will end up with a backsplash that looks clean, holds in place, and can be removed cleanly when the time comes.
Ready to get started? Pick up your tiles, give that wall a proper clean, and start from the centre. If you found this guide useful, leave a comment below with how your project turned out, or check out the next post on simple DIY upgrades that add real value to your home.